For the content on the landing page, we are going to create 3 columns that have images, a short description, and a call-to-action link inside each section.
Click on the red + button to create a new section that has only 1 column. Once we have created and configured the first column, we will duplicate it so we have 3 identical columns.
Go to the ‘Edit Section’ panel and click on Layout
Layout:
Content width: Boxed
Width = 1000 pixels
Style:
Background
Background Type: Click on the paintbrush, then the color palette, and choose a color. For this background we used #F7F7F7
Advanced:
Margin: Top, Right, Bottom and Left = 0
Padding:
Top: 35
Right: 0
Bottom: 30
Left: 0
Column Settings
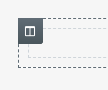
Click on the ‘Handle’ in the top left corner of the first column
Go to the ‘Edit Column’ panel and click on Style
Style:
Background
Background Type = click on the paintbrush, then the color palette and choose white for the column background color
Border
Border Type: Solid
Width: Top, Right, Bottom and Left = 1
Color: Choose a light grey
Advanced
Advanced
Margin
Top: 0
Right: 0 (this will provide space between each column)
Bottom: 0
Left: 0
Padding: Top, Right, Bottom and Left = 0
Inserting An Image Into A Column
Click on the 9 little dots on the top right of the editing panel to open up the widget panel. Find the ‘Image’ widget and drag this into the column you were just editing.
Go to the ‘Edit Image‘ panel.
Content:
Image
Image: Choose an image for this column
Advanced:
Advanced
Margin: Top, Right, Bottom, and Left = 0
Padding: Top, Right, Bottom, and Left = 0
Adding the Column Header
Click on the 9 little dots on the top right of the editing panel to open up the widget panel. Find the ‘Heading‘ widget and drag it in the column under the image you just inserted.
Now go to the ‘Edit Heading‘ panel.
Content:
Title: Add the text for the header here
Alignment: Left
Style:
Title
Text Color: Choose a color of the header
Typography
Family: Choose a type face
Size: 20
Weight: Normal
Advanced:
Advanced
Margin: Top, Right, Bottom and Left = 0
Padding
Top = 0
Right = 10
Bottom = 0
left to = 10
Adding Text
Click on the 9 little dots on the top right of the editing panel to open up the widget panel. Find the ‘Text Editor‘ widget and drag it in the column under the column header.
Now go to the ‘Edit Column‘ editing panel.
Content:
Text Editor
Add the text for the column here
Style:
Alignment: Left
Text color: Choose a color for the text
Typography
Family: Choose a typeface
Size: 14
Weight: Normal
Advanced:
Advanced
Margin: Top, Right, Bottom, and Left = 0
Padding
Top: 0
Right: 10
Bottom: 0
Left: 10
Duplicating Elements
Now that we have built the first column, we will need to duplicate this column twice, so we have 3 identical columns in total. Duplicating the columns will save time configuring the other 2 manually.
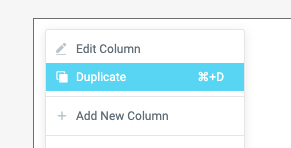
Hover in the top left-hand corner of the column to reveal the column handle
Right-click and click ‘Duplicate‘
Repeat this one more time so you have 3 identical columns
You can now click on to images in the other columns to replace them
Hover in the right-hand corner of the image and click on the pencil icon
Go to the ‘Edit Image‘ panel
Content:
Image: Replace image
Repeat this step for the image in the 3rd column
To edit the header and text
Click on the header or text in each column
Go to Content in the text edit panel and replace text
The content section for the landing page should look something like this:
You have now completed the step-by-step guides to create a header and footer template with navigation menus, a hero section, and the first part of the page content. All that is left now is the last section for this landing page.
Are you able to create this on your own? Take everything you have learned in this landing page guide to recreate this last section by yourself.
Before you go ahead and create this section, save all changes made first.